
Q.1. What is the Microsoft Power Point?
Ans. PowerPoint is a presentation software developed by Microsoft that allows users to create slideshows by combining text, images, and multimedia like videos and sounds. It is used to design and deliver structured and engaging electronic presentations for various professional, educational, and casual purposes. Users can customize slides with different design templates, fonts, and animations, and the final product can be shared online, printed as handouts, or presented live.
- Creating slideshows: It uses individual pages, called slides, to convey information in a structured format.
- Multimedia integration: Users can easily add text, images, audio, video, and shapes to their slides.
- Customization: PowerPoint provides a wide range of design templates, formatting tools, and animation options to make presentations visually appealing.
- Animations and transitions: It includes features to add animations to elements on a slide and transition effects between slides.
- Sharing and output: Presentations can be saved as a webpage, shared in real-time online, or printed as handouts for an audience.
- Part of Microsoft Office: It is often bundled with other Microsoft productivity tools like Word and Excel.
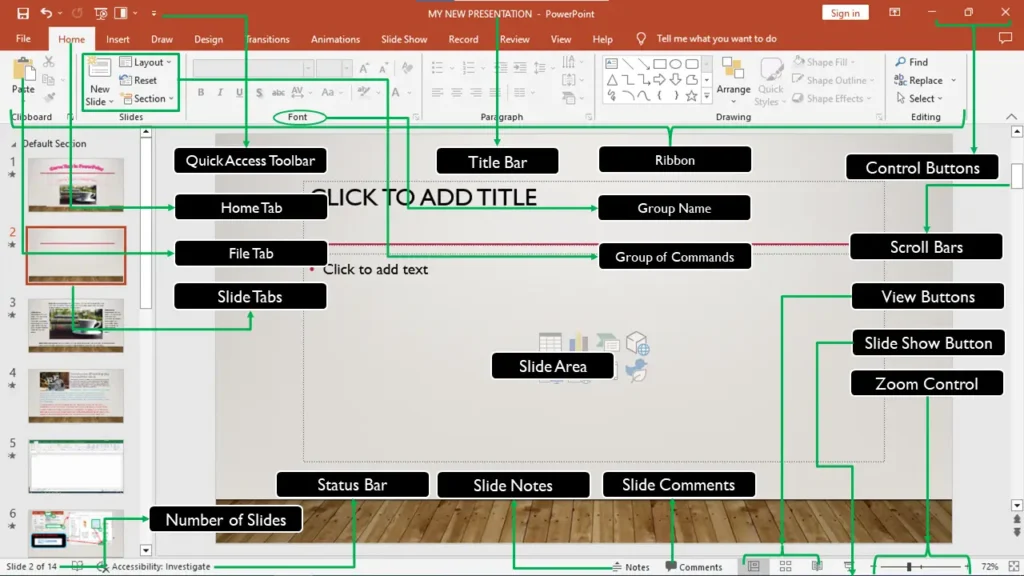
- File Tab: –
File Tab have several options such as-New, Open, Save, Save As, Print, Print Preview and close Button etc.
- Quick Access Toolbar-
The quick access tool bar provides shortcut icon such as-save, Undo, Redo etc. These icons are used Save-to save the Presentation file, Undo- to reverse the last command and Redo-to reverse the undo command.
- Title Bar-
Display the name of program and currently active Power Point Presentation file & such as- MS Power Point control menu icon Minimize, Restore, Maximize and close button.
- Menu Bar of MS Power Point: –
MS Power Point has Seven Menus such as-Home, Insert, Design, Animations, Slide Show, Review and View. Every Menu have several groups.
Ribbon Tool Bar-
Ribbon Tool bar is designed to help you quickly find the commands that you need to complete a work.
- Ruler Bar-
MS-Power Point window has two ruler bars as like Horizontal ruler bar and Vertical Ruler Bar. The Horizontal Ruler bar is used to set the margin Left and right side of the slide. The Vertical Ruler bar is used to set the margin Top and Bottom of the slide.
- Scroll Bar-
MS-Power Point window has two scroll bar such as- vertical Scroll bar and Horizontal scroll bar. The Vertical scroll bar is used to move the slides vertically and horizontal scroll bar is used to move the slides horizontally.
- Status Bar-
Display the information about the active Presentation file as like- current slide Number, and how many slides in the active Presentation file etc. The Status bar, in right side display slide’s view icon, such as – normal, slide sorter, slide show and zoom slider.
- Task Bar- ‘Task Bar’ displays several programs to use any Presentation files as you like.
*SHORT COMMANDS*
| S. NO. | SHORT COMMAND | RESPONSE |
| 1 | CTRL + N | Create a New Presentation file |
| 2 | CTRL + W | Close a Presentation file |
| 3 | CTRL + Q | Exit Power Pint Program |
| 4 | SELECT SLIDE + ENTER | Display Slide Normal View |
| 5 | ALT+V+D | Slide Sorter View |
| 6 | F5 | Slide Show |
| 7 | CTRL+M or ALT+H+I | Insert New slide |
| 8 | CTRL+D | Duplicate Slide |
| 9 | CTRL+F2 | Print Preview |
| 10 | ALT+O+R | Replace Font |
| 11 | ALT+V+Z | Open zoom Dialog box |
| 12 | ALT+O+F | Open Font dialog Box |
| 13 | ALT+O+B | Open Bullet and Numbering Dialog box |
| 14 | ALT+N+T+I | Insert Table dialog box |
| 15 | ALT+N+D | Open Header and Footer Dialog Box |
| 16 | ALT+G+S | Open Page setup Dialog box |
| 17 | ALT+G+TC | Change Font color |
| 18 | ALT+G+B | Change Background style |
| 19 | ALT+G+H | Open Themes dialog box |
| 20 | ALT+N+C | Insert Chart Dialog box |
| 21 | ALT+N+P | Insert Picture |
| 22 | ALT+A+C | Open Custom Animation Dialog box |
| 23 | ALT+A+U | Display all sounds |
| 24 | ALT+W+C | Display all color slides |
| 25 | ALT+W+O | Display all gray color slides |
| 26 | ALT+W+B | Display all Black and white slides. |
| 27 | ALT+W+L | Normal Slides |
| 28 | ALT+W+T | Notes Page Slide |
| 29 | ALT+W+S | Slide show |
| 30 | ALT+W+M | Design Master Slide |
| 31 | ALT+W+H | Design Handout Master |
| 32 | ALT+W+R | Display Hide/Unhide Ruler Bar. |
File Tab:-
New- Create a New Presentation file .
Open- Opens and find the Presentation file.
Save- Save the active Presentation file by any name.
Save As- Save the active Presentation file with a different file name.
Print Preview- Show the Presentation file when you print it.
Close- Close the Presentation file.
[1] Home Menu:-
This menu is divided in six groups such as-Clipboard, Slides, Font, Paragraph, Drawing and Editing.
- Clipboard Group-
- Cut- Remove the selected text and objects.
- Copy- Copies the Selected text and objects.
- Paste- Paste the copies text and objects on the particular slide.
- Format painter- Copy formatting from one place and apply in to another .
- Slides Group-
- New slide- Add new slides in a particular presentation file.
- Layout- Change layout of the selected slide.
- Reset- Reset the position, size, and formatting of the slide placeholder to their default settings.
- Delete Slide- Remove the selected slide from the presentation file.
- Font Group-
- Font- Change the font of selected text.
- Font size- Change the font size of selected text.
- Bold- Bold the selected text.
- Italic- Italic the selected text.
- Underline- Underline of the selected Text.
- Strikethrough- Draw a line through middle of the selected text.
- Text Shadow- Add a shadow behind the selected text to stand outside.
- Character spacing- change the space between the characters.
- Font Color- Change the color of selected text.
- Change Case- Change the selected text in Upper case, Lower case, and sentence case.
- Increase & Decrease Font size- Increase & decrease font size of the selected text.
- Paragraph Group-
- Bullets- Apply the bullets of selected text.
- Numbering- Apply the numbering of selected text.
- Line Spacing- Change the space between lines of the selected text.
- Text Direction- Change the orientation of text vertical, stacked, and rotate in to the desired direction.
- Columns- Split text into two or more columns.
- Align Text- Change the text align with in the text box.
- Alignment- set alignment of the selected text, left, right, center, and justify.
- Convert to Smart Art Graphic- convert text to smart art graphic-such as organization chart, Pyramid List etc.
- Drawing Group-
- Text Box- Insert ready-made shapes, such as Text box, Line, Rectangle, circle, flowchart, symbols etc.
- Arrange- Arrange objects on the slide by changing their order, position and rotation.
- Quick Styles- Choose a visual style for the shape or line.
- Shape Fill- Fill the selected shape with a solid color, gradient, picture, or texture.
- Shape Outline- Specify the color, width, and line style for the outline of the selected shape.
- Shape Effects- Apply a visual effected to the selected shape, such as shadow, glow, reflection, or 3-D rotation.
- Editing Group-
- Find- Search for any one word in the Presentation file.
- Replace- Replace the selected word in the Presentation file.
- Select- Select all text and object.
[2] Insert Menu:-
This menu is divided in five groups such as-Tables, Illustrations, Links, Text and Media Clips.
- Tables Group-
- Table- First time click on table icon, then click Insert table. Open Insert table dialog box. You can fill the number of rows and columns after that click on OK button.
- Illustrations Group-
- Picture- Insert a picture or image on a active slide.
- Clip Art- Insert the clip art on the active slide.
- Shapes- Insert the several type of basic shapes on the active slide.
- Smart Art- Insert Smart Art Graphics of different category.
- Chart- Insert several type of chart on the active slide.
- Text Group-
- Text Box- Insert a text box in the active Presentation file.
- Header & Footer- Edit the Header or Footer of the active slide in Normal View.
- Word Art- Insert decorative text on the active slide in normal view.
- Date & Time- Insert the current date or time on to the current slide in normal view.
- Slide Number- Insert the slide number in normal view position.
- Symbol- Insert Symbols that are not on our keyboard in the active Presentation file.
- Object- Insert the Object from other program(Bitmap Image) in the active word Presentation file.
- Media Clips-
- Movie- Click here to insert an animated clip art.
- Sound- Click here to add music from a CD or to record a sound with a microphone.
[3] Design Menu:-
This menu is divided in three groups such as- Page setup, Themes, and page Background.
- Page Setup Group-
- Page Setup- click on this option, open page setup dialog box-in this dialog box we can change slide height and width, slide orientation etc.
- Themes Group-
- Change the overall design of the active Presentation file including, colors, fonts and effects.
- Page Background Group-
- Background Styles- Choose the background style for this theme.
- Hide Background Graphics- Don’t show the background graphic included in the theme your have selected.
[4] Animations Menu:-
This menu is divided in three Groups such as- Preview, Animations, and Transition to this slide.
- Preview Group-
- Preview- Preview the animations and slide transition you have created for this slide.
- Animations Group-
- Animate- Choose an animation to apply to objects in the slide.
- Custom Animation- Open the custom Animation Task Pane so that you can animate individual objects on the slide.
- Transition the this slide Group-
- Transition Sound- Select a sound to play during the transition between the previous slide and the current slide.
- Transition Speed- Choose how fast to animate the transition between the previous slide and the current slide.
- Apply To All- Set the transition between all slides in the presentation to be like the transition you have set up for the current slide.
- On Mouse Click- Wait until a mouse click to move to the next slide.
- Automatically After- Move to the next slide after a certain number of seconds.
[5] Slide Show Menu:-
This menu is divided in three groups such as- Start slide show, Set Up and Monitors.
- Start Slide show Group-
- From Beginning- Start the slide show form the first slide.
- From Current slide- Start the slide show form the current slide.
- Custom slide Show- A custom slide show display only the slides you select.
- Set Up Group-
- Set Up Slide Show- Set up advanced options for the slide show, such as kiosk mode.
- Hide Slide- Hide the current slide from the presentation.
- Record narration- Record a narration track using the microphone attached to your computer.
- Rehearse Timings- Launches a full screen slide show in which you can rehearse your presentation.
- Use Rehearsed Timings- Use the timings you created using Rehearse timing to switch between slides automatically.
- Monitors Group-
- Resolution- Choose the screen resolution to use for the full-screen slide show.
- Show Presentation On- Choose a monitor on which to display the full-screen slide show.
- Use Presenter View- Show the full-screen slide show using Presenter View.
[6] Review Menu:-
This menu is divided in three groups such as-Proofing, Comments, and Protect.
- Proofing Group-
- Spelling Grammar- Check the spelling & grammar of the active Presentation file.
- Language- Set the language used to check the spelling and grammar of the selected text.
- Comments-
- Show markup- Show comments and other annotations.
- New Comment – Add the comment of selection text of the active Presentation file.
- Edit Comment- Edit the selected comment.
- Delete Comment- Delete the selected comment.
- Previous- Navigate to the previous comment in the document.
- Next- Navigate to the next comment in the document.
- Protect Group-
Protect Presentation- Restrict how people can access the Presentation.
[7] View Menu:-
This menu is divided in six groups such as- Presentation Views, Show/Hide, Zoom, Color/Grayscale, Window, Macros.
- Presentation Views Group-
- Normal- View the Presentation slide in normal view.
- Slide Sorter- View the presentation in Slide Sorter view to easily rearrange slides.
- Notes Page- View the notes Page to edit the speaker notes as they will look when you print them out.
- Slide Show- Start the slide show on the full screen by the short command F5.
- Slide Master- Open slide master view to change the design and layout of the master slides.
- Handout master- Open Handout master view to change the design and layout of printed handouts.
- Notes master- Opens and editing Notes master view slide.
- Show/Hide Group-
- Ruler- Display or hide Ruler bar in normal view slide mode.
- Gridlines- Display or hide Gridlines in normal view slide mode.
- Zoom Group- Display large and reduce size of the slides in Presentation file.
- Color/Grayscale Group-
- Color- View the presentation slide in full color.
- Grayscale- View the presentation slide in grayscale, and customize how the colors are translated into grayscale.
- Pure Black and White- View the presentation slide in Pure black & white, and customize how the colors are
- Window Group-
- New Window- Create a new window containing a view of the current Presentation file.
- Arrange All- Tile all open program windows side by side on the screen.
- Cascade- Cascade the open document windows on the screen so that they overlap.
- Split- Split the current window into two parts so that you can view different section of the Presentation file at the same time.
- Switch Windows- Switch to a different currently open window.
- Macros Group-
- Macros- View the list of macros, from which you can run, create, or delete a macro.
=xxxxx=