[Microsoft Excel]
Q.1. What is the MS-Excel?
Ans. MS Excel is an electronic Spreadsheet software package. Excel includes all standard features, such as- automatic recalculations, graphs and formulas. Formulas are used to perform basic mathematical operations, to find the average, maximum, or minimum values in a specified range of data. Any type of data Excel can used to include numbers, data and formulas.
Q.2. What is the Spreadsheet?
Ans. A Spreadsheet is a table used to store various types of data. The data is arranged in rows and columns to make it easier to store, organize, and analyze the information.
Q.3. What is the use of MS-Excel?
Ans. The package provides, statistical, financial and scientific functions. Excel is a powerful tool used to create and format spreadsheets. It is commonly used to prepare the financial statements, Business statements and accounting and in Engineering environments and to analyze numerical data.
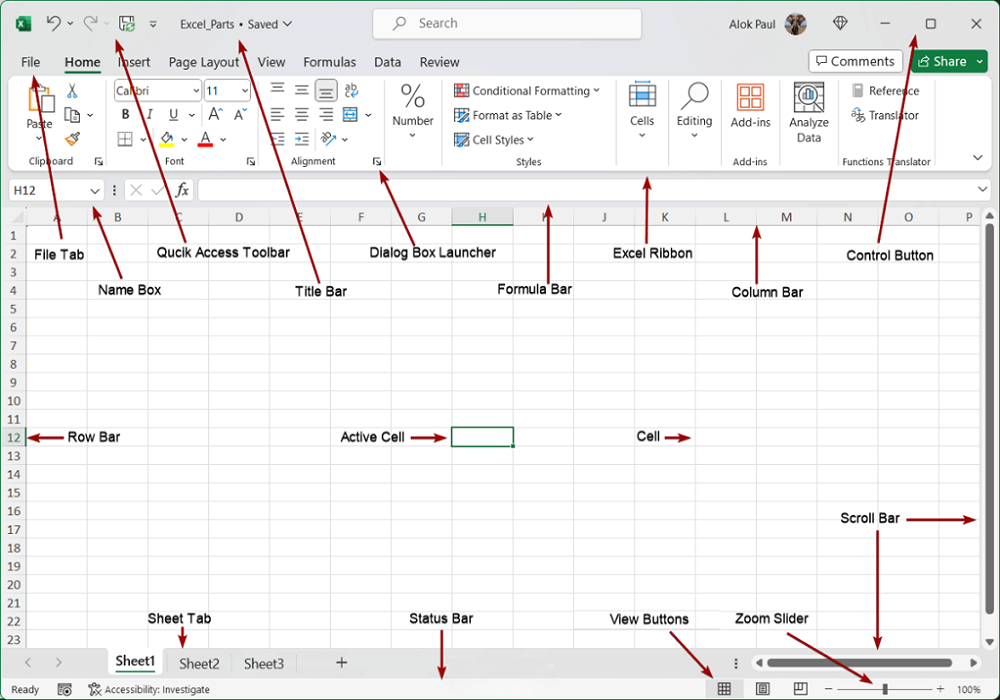
- File Tab: – Office Button display several options such as-New, Open, Save, Save As, Print, Print Preview and close Button in the left side top corner of the window.
- Quick Access Toolbar–The quick access tool bar provides shortcut icon such as – save, Undo, Redo etc. These icons are used Save-to save the work Book, Undo- to reverse the last command and Redo-to reverse the undo command.
- Title Bar–Display the name of program and currently active Excel Work Book, control menu icon as like Minimize, Restore, Maximize and close button.
- Menu Bar–MS Excel has Seven Menus such as-Home, Insert, Page Layout, Formulas, Data, Review and View.
- Ribbon Tool Bar–Ribbon Tool bar is designed to help you quickly to find the commands that you need to use to complete a task.
- Cell Reference (Name Box)– It is positioned just below the ribbon tool bar in left side, a cell reference identifies the location of row and column.
- Formula Bar-A formula bar is used to apply the various type of formulas to calculate mathematical values-such as sum, subtracts, multiply and divide etc.
- Column Headings–Columns are known by ABCD letters in vertical in the spreadsheet.
- Row-Rows are mansions in numbers in left side of spreadsheet. The row travel horizontally from top to bottom.
- Cell-Cells are the basic rectangular building blocks of a spreadsheet.
- Sheets- Excel is organized like a workbook in multiple pages marked as: sheet1, sheet2, and by a default sheets-3- are displayed in order to work with more sheets.
- Scroll Bar-MS-Excel window has two scroll bars such as- vertical Scroll bar and Horizontal scroll bar. The Vertical scroll bar is used to move the worksheet vertically and horizontal scroll bar is used to move the Worksheet horizontally.
- Task Bar-‘Task Bar’ situated bottom of the window. Displayed open several programs and Work Books in the Task Bar.
Q.4. How many rows, column and sheets in a workbook?
Ans. Excel can maintain large volumes of data at a time. A workbook can contain 255 worksheets. A Worksheet can contain 1048576 row and 16384 columns. A single cell can contain a maximum of 255 characters.
Formula for Sum–
=sum (B2:F2) Press Enter Key [Horizontally]
=sum (B2:B14) Press Enter Key [Vertically]
| S. NO. | COMMAND | RESPONSE |
| 1 | CONTROL+HOME KEY | Move the cell in first row and column ‘A’ |
| 2 | PRESS TAB KEY | Move the cell left to right by one-one column |
| 3 | PRESS SHIFT + TAB KEY | Move the cell right to left by one-one column |
| 4 | PRESS ENTER KEY | Move the cell top to bottom by one-one row |
| 5 | PRESS SHIFT+ENTER KEY | Move the cell bottom to top by one-one row |
| 6 | SHIFT+à | Select left to right one by one column |
| 7 | SHIFT+ß | Select right to left one by one column |
| 8 | SHIFT+â | Select up to down one by one cell |
| 9 | SHIFT+á | Select down to up one by one cell |
| 10 | SHIFT + SPACE KEY | Selection of the one row |
| 11 | CONTROL+SPACE KEY | Selection of the one column |
| 12 | CONTROL+SHIFT+ | Selection of the Data |
| 13 | CONTROL+A | Select all worksheet |
| 14 | CONTROL + Page Down Key | Move the sheet Forward |
| 15 | CONTROL + Page UP Key | Move the sheet Backward |
| 16 | SHIFT + F11 Key | Insert worksheet |
| 17 | CONTROL + SHIFT + = | Open dialog box- Insert row, column and cell |
| 18 | ALT + = | Auto Sum Formula |
| 19 | CONTROL +1 | Open Dialog box- Format Cell |
| 20 | CONTROL+F9 | Minimize worksheet |
| 21 | CONTROL + F10 | Maximize worksheet |
| 22 | CONTROL+F1 | Display/Hide Ribbon Tool bar |
| 23 | CONTROL+F2 | Print Preview |
| 24 | CONTROL+F4 | Close worksheet |
| 25 | CONTROL+F5 | Restore worksheet |
| 26 | CONTROL+2 | Bold-Number, data & Formulas |
| 27 | CONTROL+3 | Italic- Number, data & Formulas |
| 28 | CONTROL+4 | Underline- Number, data, & Formulas |
| 29 | CONTROL+9 | Hide the selected Row |
| 30 | CONTROL+SHIFT+( | Unhide any hidden rows within the selection |
| 31 | CONTROL+0 | Hide the selected Column |
| 32 | CONTROL+SHIFT+) | Unhide any hidden columns within the selection |
| 33 | CONTROL+ (-) | Open dialog box- delete, row, column & cell |
| 34 | CONTROL+F | Open dialog box-find a number |
| 35 | CONTROL+G | Open dialog box-Go To, Formula, comment, etc. |
| 36 | CONTROL+H | Open dialog box-Find and Replace-Number, data |
| 37 | CONTROL+ ; | Insert current date |
| 38 | CONTROL+SHIFT+; | Insert current time |
| 39 | SHIFT+F2 | Insert comment |
| 40 | SHIFT+F3 | Open dialog box – Insert Function |
| 41 | ESC | Cancel a command |
| 42 | CONTROL+ [ | Go to Data Sheet |
| 43 | CONTROL + ] | Go to Formula |
| 44 | ALT+TAB | Switch to the next window |
| 45 | ALT+SHIFT+TAB | Switch to the previous window |
| 46 | ALT+F5 | Restore the size of the active window |
| 47 | TAB or SHIFT + TAB | When a task pane is active, select the next or previous option in the task pane. |
| 48 | CONTROL+SHIFT+ & | Applies the outline border to the selected cells |
| 49 | CONTROL+SHIFT+ _ | Removes the outline border from the selected cells. |
| 50 | CONTROL+SHIFT+ $ | Applies the currency format with two decimal places . |
| 51 | CONTROL+SHIFT+ ~ | Applies the General number format. |
| 52 | CONTROL+SHIFT+ % | Applies the Percentage format with no decimal places. |
| 53 | CONTROL+SHIFT+ ! | Applies the number format with two decimal places. |
| 54 | CONTROL+D | Use the Fill Down command to copy the contents and format of the topmost cell of a selected range into the cells below. |
| 55 | CONTROL+R | Uses the Fill Right command to copy the contents and format of the leftmost cell of a selected range into the cells to the right. |
| 56 | PRESS ‘Page Down’ Key | Move one screen down side in a worksheet |
| 57 | Press ‘Page Up’ Key | Move one screen up side in a worksheet |
| 58 | ALT + Page Down | Move one screen to the right in a worksheet |
| 59 | ALT + Page Up | Move one screen to the left in a worksheet |
| 60 | CONTROL+SHIFT+Page Dn | Select the current and next sheet in a workbook |
| 61 | CONTROL+SHIFT+Page Up | Select the current and previous sheet in a workbook. |
| 62 | CONTROL + F6 | Switches to the next workbook window when more than one workbook window is open. |
| 63 | SHIFT + F10 | Open the short command |
| 64 | F8 | Extend the Selection in a worksheet |
| 65 | CONTROL+SHIFT+End | Select all data start to End in the worksheet |
| 66 | CONTROL+SHIFT+Home | Select all data end to start in the worksheet |
File Tab: –
New– Create a New Worksheet.
Open- Opens and find the Worksheet.
Save- Save the active Worksheet by any name.
Save As– Save the active Worksheet with a different name.
Print Preview– Show the Worksheet when you print it.
Close- Close the Worksheet.
[1] Home Menu: –
This menu is divided in seven groups such as-Clipboard, Font, Alignment, Number, Styles, Cells, Editing,
- Clipboard Group–
- Cut– Remove the selected data and objects.
- Copy- Copies the Selected data and objects.
- Paste- Paste the copies data and objects on the particular cell.
- Format painter- Copy formatting from one place and apply in to another.
- Font Group-
- Font- Change the font of selected data.
- Font size- Change the font size of selected data.
- Bold- Bold the selected Data.
- Italic– Italic the selected data.
- Underline- Underline of the selected Data.
- Bottom Border- Draw Border to selected range in the worksheet.
- Fill Color- Fill color in the background of selected cell.
- Font Color- Change the color of selected text or numbers.
- Alignment Group-
- Top Align– Align text to the top of cell in the worksheet.
- Middle Align– Align text so that it is centered between the top and bottom of the cell.
- Bottom Align- Align text to bottom of the cell in the worksheet.
- Align Text Left- Align text and number to the left side in the cell.
- Center- Apply center alignment in selected data range.
- Right Align– Apply the right alignment in selected data range.
- Orientation– Rotate text and number to a additional angle or vertical orientation.
- Wrap Text– Make all content visible within a cell by displaying it on multiple lines.
- Merge & Center-Join the selected cells into one larger cell and centers the contents in the new cell.
- Number Group-
- Change number in currency, percentage, date and time etc.
- Style Group-
- Conditional Formatting- Display number in different color and style according your condition.
- Format as Table- Quickly format a range of cells and convert table by choosing a pre-defined table style.
- Cell Styles– Quickly format a cell by choosing from pre-defined styles.
- Cells Group-
- Insert- Insert cells, rows, or columns into the active worksheet.
- Delete- Delete rows or columns from the active worksheet.
- Format- Change the selected row high or column width, in the active worksheet.
E. Editing-
a. Auto Sum- Display the automatically sum of the selected cells.
b. Fill- Fill the cell in any direction of the active worksheet.
c. Clear- Remove the selected data and formatting in active worksheet.
d. Sort & Filter- Display the data ascending or descending order in the worksheet.
e. Find & Select- Find, replace text & number or select object and comments.
[2] Insert Menu: –
This menu is divided in five groups such as-Tables, Illustrations, Charts, Links and Text.
- Tables Group–
- Pivot Table- This option is used to arrange complicated data in easier summarize.
- Table– Make a table to manage and analyze related data.
- Illustrations Group–
- Picture- Insert a picture from other folder or documents in active worksheet.
- Shapes- Insert several types of basic shapes in the active worksheet.
- Smart Art- Insert Smart art graphics of different category.
- Chart Group- Create all type of chart from any data table such as- Column, Line, Pie, Bar, Area, and other chart etc.
- Links Group– Create a link to a web page, a picture, an e-mail address, or a program. But it is not used to here.
- Text Group-
- Text Box– Insert a text box that can be positioned anywhere on the worksheet.
- Header & Footer– Edit the header & footer of the Worksheet. The Content in the header & footer will appeared at the top and Bottom of each printed page.
- Word Art– Insert decorative data in the active Worksheet.
- Object- Insert the Object from another program (Bitmap Image) in the active Excel Worksheet.
- Symbol-Insert characters that are not on your keyboard such as Alfa, Vita, Gama etc.
[3] Page Layout Menu: –
This menu is divided in five groups such as- Themes, Page setup, Scale to Fit, Sheet Options, Arrange.
- Themes Group–
- Change the overall design of the active Worksheet including, colors, fonts and effects.
- Page Setup Group–
- Margins- Set margins of the active Worksheet, like- top, bottom, left and right.
- Orientation– Set paper orientation such as- Portrait and Landscape.
- Size– Set paper size such as- A4, Letter, A3, and Legal etc.
- Print Area– Select the data area then click print area option for the print.
- Breaks– This option is used to only for Page break.
- Background– Choose an image to display as the background of the sheet.
- Print Titles– Specify rows and columns to repeat on each printed page.
- Scale to Fit Group– The maximum height and width must be set to “Automatic” use this feature. In actual size.
- Sheet Options– Display or hide Gridlines and rows or columns headings in preview and print.
- Arrange Group–
- Bring to Front– Set the object to front of two objects.
- Send to Back– Set the object to back of two objects.
- Align- Set the alignment of the multiple selected objects.
- Group– Make a group of many selected objects.
- Rotate– Flip Rotate of any selected objects.
[4] Formulas Menu: –
This menu is divided in Four Groups as like Function Library, Defined Names, Formula Auditing and Calculation.
- Function Library Group–
- Insert Function– Click on this function-open Insert Function dialog box- In this dialog box you can use many formulas such as-Sum, Average, minimum and maximum marks.
- Auto Sum– Display the Automatically sum of the selected cells.
- Recently Used– Display the list of recently used options.
- Logical– Display the list of logical functions.
- Date & Time– Display the list of related date & time functions.
- Defined Names–
- Define Name– Name cells so that you can refer to them in formulas by that name.
- Name Manager– Create, edit, delete and find all names used in the workbook.
- Formula Auditing–
- Trace Precedents– Show all arrow that indicate of cells currently selected formula value.
- Trace Dependents– Show arrow that indicate of formula of selected cells.
- Remove Arrow– Remove all arrow at a time.
- Show Formulas– Display the formula in each cell instead of resulting value.
- Error Checking– Check for common errors in the formulas.
- Evaluated Formula– Display the evaluate formula dialog box to evaluating each part of the formula.
- Watch window–
- Calculation Group-
a. Calculation options- basically every time active automatic calculation option.
[5] Data Menu: –
This menu is divided in five groups such as- Get External Data, Connections, Sort & Filter, Data Tools, Outline. Get External Data & Connections both are useless Groups.
- Sort & Filter Group–
- Sort– Display the name & number ascending or descending order.
- Filter– Filter the greater then/less then number in the active worksheet.
- Advanced Filter– Filter the particular alphabet data in the active worksheet.
- Data Tools Group–
- Text to Columns– Separate the contents of one excel cell into separate columns.
- Remove Duplicates– Delete duplicates row from a sheet.
- Data Validation– Prevent invalid data from being entered into a cell.
- What-If Analysis–Scenario Manager– It is used to record title of the permanent in active worksheet. Goal Seek– Goal seek will find the right input when you know the result you want.
- Outline Group–
- Group– Group the selected row and columns in the active worksheet.
- Ungroup– Ungroup a range of cell and columns that were previously grouped.
- Subtotal– Total several rows of related data together by automatically inserting subtotals and totals for the selected cells.
[6] Review Menu: –
This menu is divided in three groups such as-Proofing, Comments and Changes.
- Proofing Group–
- Spelling Grammar– Check the spelling & grammar of the active Worksheet.
- Comments Group-
- New Comment – Add the comment of selected cell in the active Worksheet.
- Delete– Delete the selected cell comment in the active worksheet.
- Previous– Move the previous comment in the active worksheet.
- Next– Move the next comment in the active worksheet.
- Show/Hide Comment– Show or hide comment of the selected cell in the active worksheet.
- Show all Comments– Display all comment in the active worksheet.
- Changes Group-
a. Protect Sheet- Protect the active sheet in open workbook.
[7] View Menu: –
This menu is divided in five groups as like Workbook views, Show/Hide, Zoom, Window and Macros.
- Workbook Views Group–
- Normal– View the worksheet in the normal view.
- Print Layout– View the Worksheet as it will appear on the printed page.
- Page Break- View a preview of where pages will break when this worksheet is printed.
- Custom Views- Save a set of display and print setting as a custom view.
- Full Screen – View the worksheet in the full screen mode.
- Show/Hide Group–
- Ruler- Display or hide Ruler bar in the preview worksheet.
- Gridlines– Display or hide Gridlines in the active worksheet.
- Formula Bar– Hide/Unhide Formula bar in the active worksheet.
- Headings– Show/Hide Row or columns heading in the active worksheet.
- Zoom Group– Display large and reduce size of the active Worksheet.
- Zoom– Open the zoom dialog box to specify zoom level of the worksheet.
- 100%– Zoom the worksheet in 100% of the normal size.
- Zoom to Selection– Zoom the worksheet so that the currently selected range of cells fills the entire window.
- Window Group–
- New Window– Create a new window containing a view of the current Worksheet.
- Arrange All– Tile all open program windows side by side on the screen.
- Freeze panes-Keep a portion of the sheet visible while the rest of sheet scrolls.
- Split- Split- Split the window into multiple resizable panes contacting views of your worksheet.
- Switch Windows– Switch to a different currently open window.
=xxxxx=