Q.1. What is the MS Word?
Ans. A word Processor is the Component of Microsoft Office. MS- Word is a word processing software package. We can use to type a letter, application, Bio-Data, resume, report and other documents etc.
Q.2. What is the Microsoft Office?
Ans. Microsoft office is a popular set of software programs from Microsoft that includes a word processor, a spreadsheet tool, a presentation program, a database program, an email utility and other productivity software commonly used in modern offices.
Components of Microsoft office include Microsoft word, a popular word processing tool, Microsoft Excel, a program used for creating and editing spreadsheets, Microsoft Outlook, used for managing email and calendars, Microsoft Access, used for maintaining databases, and Microsoft One Note, used for taking notes at home, school or work.
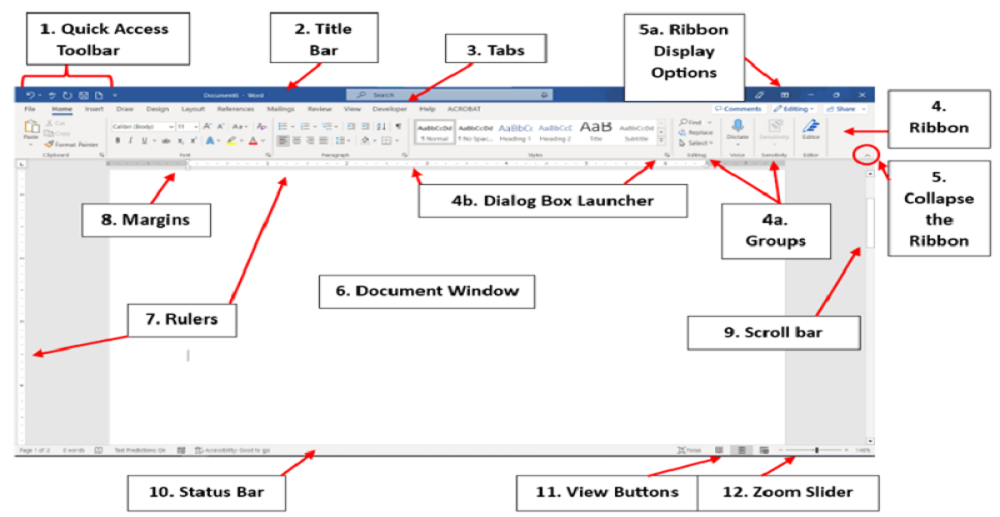
- Quick Access Toolbar-
The quick access tool bar provides shortcut icon such as-save, Undo, Redo etc. these icons are used Save-to save the document, Undo- to reverse the last command and Redo-to reverse the undo command.
- Title Bar-
Display the name of program and currently active word document & such as- MS-word control menu icon Minimize, Restore, Maximize and close button.
- File Tab: –
File Tab display the just below quick access toolbar. File tab has several options such as as-New, Open, Save, Save As, Print, Print Preview and close Button etc.
- Menu Bar of MS-Word: –
MS word has Seven Menus/tabs such as-Home, Insert, Page Layout, References, Mailings, Review and View. Every Menu/tab have several groups. Home Menu have five groups such as-Clipboard, Font, Paragraph, Styles and Editing.
- Ribbon Tool Bar-
Ribbon Tool bar is designed to help you quickly find the commands that you need to complete a task.
- Ruler Bar-
MS-word window has two ruler bars as like Horizontal ruler bar and Vertical Ruler Bar. The Horizontal Ruler bar is used to set the margin Left and right side of the paper. The Vertical Ruler bar is used to set the margin Top and Bottom of the paper.
- Scroll Bar-
MS-word window has two scroll bar such as- vertical Scroll bar and Horizontal scroll bar. The Vertical scroll bar is used to move the document vertically and horizontal scroll bar is used to move the document horizontally.
- Status Bar-
Display the information about the active document as like Number of pages, Line, and words etc. The Status bar, in right side display page view icon and zoom slider.
- Task Bar-
‘Task Bar’ displays several programs to use any documents as you like.
*SHORT COMMANDS*
| S. NO. | SHORT COMMAND | RESPONSE |
| 1 | ALT+F | Open the Office Button |
| 2 | CTRL+N | Create a New Document |
| 3 | CTRL+O | Open a Document |
| 4 | CTRL+S | Save the Document |
| 5 | F12 | Save As |
| 6 | CTRL+ALT-I | Print Preview |
| 7 | CTRL+P | Print the Document |
| 8 | CTRL+W | Close the Document |
| 9 | CTRL+Z | Undo to reverse the last command. |
| 10 | CTRL+Y | Redo to reverse the undo command. |
| 11 | CTRL+A | Select All Pages. |
| 12 | CTRL+SHIFT+â | Select the Paragraph |
| 13 | SHIFT + HOME KEY | Select beginning of the line |
| 14 | CTRL+SHIFT+à | Select of the word one by one in right side |
| 15 | CTRL+SHIFT+ß | Select of the word one by one in left side |
| 16 | SHIFT+à | Select the character one by one in right side |
| 17 | SHIFT+ß | Select the character one by one in left side |
| 18 | SHIFT+â | Select of the line one by one in down side |
| 19 | SHIFT+á | Select of the line one by one in up side |
| 20 | CTRL+C | Copy of the Selected text and objects |
| 21 | CTRL+X | Removes the selected text and objects |
| 22 | CTRL+V | Paste of the copies text and objects |
| 23 | CTRL+SHIFT+F | Change the Font Name |
| 24 | CTRL+SHIFT+P | Change the Font Size |
| 25 | CTRL+B | Bold of the Selected Text |
| 26 | CTRL+I | Italic |
| 27 | CTRL+U | Underline of the Text |
| 28 | CTRL+SHIFT+(+) | Superscript of the text |
| 29 | CTRL+ Equal Sign (=) | Subscript of the text |
| 30 | SHIFT + F3 | Change the text in Capital, small letter |
| 31 | CTRL+SHIFT+> | Increase the font size by two-two point |
| 32 | CTRL+SHIFT+< | Decrease the font size by two-two point |
| 33 | CTRL+[ | Decrease the font size by one-one point |
| 34 | CTRL+] | Increase the font size by one-one point |
| 35 | CTRL+L | Left alignment of the page |
| 36 | CTRL+E | Center alignment of the page |
| 37 | CTRL+R | Right alignment o f the page |
| 38 | CTRL+J | Justify matter in the page |
| 39 | CTRL+T | Hanging Indent |
| 40 | CTRL+SHIFT+T | Reduce Hanging Indent |
| 41 | CTRL+1 | 1 line Space |
| 42 | CTRL+5 | 1.5 Line Space |
| 43 | CTRL+2 | 2 Line Space |
| 44 | CTRL+ALT+1 | Heading 1 style |
| 45 | CTRL+ALT+2 | Heading 2 style |
| 46 | CTRL+ALT+3 | Heading 3 style |
| 47 | CTRL+F | Find a word |
| 48 | CTRL+H | Replace a word |
| 49 | CTRL+G | Go to Particular page No. and Line No. |
| 50 | CTRL+ENTER | Page Break |
| 51 | CTRL+ALT+O | Outline view page |
| 52 | CTRL+ALT+N | Normal view page |
| 53 | CTRL+ALT+P | Print Layout page |
| 54 | ALT+V+Z | Change the zoom size of the page |
| 55 | CTRL+ALT+M | Insert comment |
| 56 | ALT+F5 | Restore window |
| 57 | ALT+F10 | Maximize window |
| 58 | CTRL+SHIFT+L | Apply Bulleted List of the Paragraphs |
| 59 | CTRL+SHIFT+F5 | Book mark |
| 60 | ESC | Cancel a just given command |
| 61 | ALT+F4 | Close the window |
| 62 | CTRL+SHIFT+ENTER | Column Break |
| 63 | CTRL+SHIFT+W | Word underline |
| 64 | CTRL+END KEY | Move the cursor end of the document |
| 65 | CTRL+HOME KEY | Move the cursor start of the document. |
| 66 | F7 | Check the spelling and grammar. |
Office Button:-
New- Create a New Document.
Open- Opens and find the document.
Save- Save the active document by any name.
Save As- Save the active document with a different name.
Print Preview- Show the document when you print it.
Close- Close the document.
[1] Home Menu:-
This menu is divided in five groups such as-Clipboard, Font, Paragraph, Style and Editing.
- Clipboard Group-
- Cut- Remove the selected text and objects.
- Copy- Copies the Selected text and objects.
- Paste- Paste the copies text and objects on the particular point.
- Format painter- Copy formatting from one place and apply in to another .
- Font Group-
- Font- Change the font of selected text.
- Font size- Change the font size of selected text.
- Bold- Bold the selected Matter.
- Italic- Italic the selected matter.
- Underline- Underline of the selected Matter.
- Subscript- Create small letters below the text of the baseline such as-(H2O).
- Superscript- Create small letters above text of the baseline such as-(10th ).
- Font Color- Change the color of selected text.
- Paragraph Group-
- Bullets- Apply the bullets of selected paragraphs.
- Numbering- Apply the numbering of selected paragraphs.
- Alignment- set alignment of the selected matter, left, right, center, and justify.
- Line Spacing- Change the space between lines of the selected matter.
- Shading- Apply the color background behind the selected text or Paragraph.
- Border- Create a border of the selected text or Paragraph.
- Style Group-
- Heading1- Apply heading1, heading2, and heading3 style of the selected matter.
- Editing Group-
- Find- Search for any one word in the document.
- Replace- Replace the selected word in the document.
- Select- Select all text and object.
[2] Insert Menu:-
This menu is divided in seven groups such as-Pages, Tables, Illustrations, Links, Header & Footer, Text and Symbols.
- Pages Group-
- Cover Page- Insert the several formatted cover page.
- Blank Page- Insert the Blank page in the active document.
- Page Break- Page break in the active document from the cursor position.
- Tables Group-
- Table- First time click on table icon, then click Insert table. Open Insert table dialog box. You can fill the number of rows and columns after that click on OK button.
- Illustrations Group-
- Picture- Insert a picture or image at current cursor position.
- Clip Art- Insert the clip art on the active document.
- Shapes- Insert the several type of basic shapes in the active document.
- Smart Art- Insert Smart Art Graphics of different category.
- Chart- Insert several type of chart in the active document.
- Links Group-
- Bookmark- Create a bookmark to assign a name to a specific point in a document.
- Header & Footer Group-
- Header- Edit the header of the document. The Content in the Header will appear at the top of each printed page.
- Footer- Edit the footer of the document. The Content in the Footer will appear at the Bottom of each printed page.
- Page Number- Insert the page number in the active document.
- Text Group-
- Text Box- Insert a text box in the active document.
- Word Art- Insert decorative text in the active document.
- Drop Cap- Create a large capital letter at the beginning of a Paragraph.
- Date & Time- Insert the current date or time in the active document.
- Object- Insert the Object from other program(Bitmap Image) in the active word document.
- Symbols Group-
- Equation- Insert Mathematically equation in the active document.
- Symbol- Insert Symbols that are not on our keyboard in the active document.
[3] Page Layout Menu:-
This menu is divided in five groups such as- Themes, Page setup, page Background, Paragraph, Arrange.
- Themes Group-
- Change the overall design of the active document including, colors, fonts and effects.
- Page Setup Group-
- Margins- Set margins of the active document, like- top, bottom, left and right.
- Orientation- Set paper orientation such as- Portrait and Landscape.
- Size- Set paper size such as- A4, Letter, A3, and Legal etc.
- Columns- Create columns of the active document.
- Breaks- This options is used to Page break, Column break, Text wrapping break etc.
- Page Background Group-
- Watermark- Set ghosted text behind content on the page.
- Page Color- Select color for the background of page.
- Page Borders- Set Page Border of every page in the active document.
- Paragraph Group-
- Indent- Set the left and right indent of the active document.
- Spacing- Set space before and after of the all paragraph in the active document.
- Arrange Group-
- Position- Set the object position in the current page.
- Bring to Front- Set the object to front of two objects.
- Send to Back- Set the object to back of two objects.
- Text Wrapping- Change the way text wraps around the selected object.
- Align- Set the alignment of the multiple selected objects.
- Group- Make a group of many selected objects.
- Rotate- Flip Rotate of any selected objects.
[4] References Menu:-
This menu is divided in Six Groups as like Table of Contents, Footnotes, Citations & Bibliography, Captions, Index, Table of Authorities.
- Table of Contents Group-
- Table of Contents- Add a table of contents to active document. Like- Level1, Level2 Level3 etc.
- Footnotes Group-
- Insert Footnote- Insert footnote of the active document in Bottom of page.
- Insert Endnote- ‘Insert End note’ end of the active document.
- Captions Group-
- Insert Caption- A caption is a line of text that appear below an object to describe it. For Example- Figure1, Figure2 etc.
[5] Mailings Menu:-
This menu is divided in five groups such as- Create, Start Mail Merge, Write & Insert Fields, Preview Results and Finish
- Create Group-
- Envelopes- Make Envelopes of any size as per your requirement.
- Labels- Make Labels of any shape and size as per your requirement.
- Start Mail Merge Group-
- Start mail Merge- Start a mail merge to create a form letter which you intend to print or email multiple times, sending each copy to a different recipient.
- Select Recipients- Choose the list of people you intend to send the letter.
- Write & Insert Fields Group-
- Insert Merge Field- Add any field from your recipient list to the document. Such as Name, Vill, Post, Distt, etc.
- Preview Results Group-
- Preview Results-Display the actual data of merge field such as- Full address fill by you.
- Finish Group-
- Finish & Merge- Complete the mail merge. You can create separate documents for each copy of the letter.
[6] Review Menu:-
This menu is divided in Six groups such as-Proofing, Comments, Tracking, Changes, Compare and Protect.
- Proofing Group-
- Spelling Grammar- Check the spelling & grammar of the active document.
- Word Count- Check the How many pages, Paragraphs, Line Number, Word and character of the active document.
- Comments-
- New Comment – Add the comment of selection text of the active document.
[7] View Menu:-
This menu is divided in five groups as like Document view, Show/Hide, Zoom, Window and Macros.
- Document Views Group-
- Print Layout- View the document as it will appear on the printed page.
- Full Screen Reading- Display the document on the full screen.
- Web Layout- Display the document as like web page.
- Show/Hide Group-
- Ruler- Display or hide Ruler bar.
- Gridlines- Display or hide Gridlines.
- Document map- Display all heading of the active document in ‘Document Map’.
- Zoom Group- Display large and reduce size of the active document.
- Window Group-
- New Window- Create a new window containing a view of the current document.
- Arrange All- Tile all open program windows side by side on the screen.
- Split- Split the current window into two parts so that you can view different section of the document at the same time.
- Switch Windows- Switch to a different currently open window.
=xxxxx=